Skip to content
Navigation Menu

IBM Cloud

  • CatalogCatalog
  • Cost EstimatorCost Estimator
    • HelpHelp
      • Docs
  • Log in
  • Sign up
  • Catalog
  • Cost Estimator
  • Help
    • Docs

  • Navigation settings

Error

Change theme

This feature is in early stage, some parts of the platform might not fully support different themes yet.

Themes
  1. Catalog
  2. Veeam Kasten - Enterprise Data Protection for Kubernetes

Readme file

        Version last updated: 11/07/2024

        Veeam Kasten installation on IKS

        Veeam Kasten is a Kubernetes-native backup and disaster recovery solution designed to protect, move, and manage containerized applications. On IBM Cloud, Kasten provides robust capabilities to ensure the safety and recoverability of your Kubernetes workloads.

        IKS (IBM Cloud Kubernetes Service) is a managed Kubernetes service to create your own cluster of compute hosts where you can deploy and manage containerized apps on IBM Cloud.

        K10 architecture

        Security and Compliance Controls

        • RBAC
        • Data Encryption AES-256-GCM
        • Auth Integrations
        • Audit/Logging
        • SIEM Integrations
        • 2 week releases/security updates
        • Secure by Design

        The aim of this ReadMe is to guide you through a full deployment of Kasten on a cluster IKS.

        Estimated duration: 90 mins including the infrastructure provisioning

        Before you begin

        This ReadMe requires the following command lines:

        • IBM Cloud CLI
        • Terraform CLI
        • git
        • jq CLI JSON processor
        • Helm package manager

        This ReadMe has been tested with the version IKS v1.29 and Veeam Kasten v7.0.5.

        Required resources

        To run the software, the following resources are required:

        • IKS Cluster
        • Persistent Storage that supports VolumeSnapshot capabilities
        • Access from the cluster to the Kasten image repository at https://charts.kasten.io/

        Provision a cluster IKS via Terraform

        These Terraform scripts will provision the following Cloud Services:

        • 1 Resource Group
        • 1 VPC
        • 3 Subnets spread out across 3 Zones
        • IKS cluster version 1.29 with 2 nodes of each 4x16 (https://cloud.ibm.com/kubernetes/catalog/create)
        • 1 Key Protect service to encrypt resources.

        Follow those steps:

        1. Clone this repository

          git clone https://github.com/lionelmace/kasten-on-iks
          
        2. Login to IBM Cloud

          ibmcloud login
          
        3. Create and store the value of an API KEY as environment variable

          export IBMCLOUD_API_KEY=$(ibmcloud iam api-key-create my-api-key --output json | jq -r .apikey)
          

          If the variable "ibmcloud_api_key" is set in your provider,
          you can initialize it using the following command
          export TF_VAR_ibmcloud_api_key="Your IBM Cloud API Key"

        4. Go to the Terraform directory

          cd terraform
          
        5. Terraform must initialize the provider before it can be used.

          terraform init
          
        6. Review the plan

          terraform plan -var-file=testing.auto.tfvars
          
        7. Start provisioning.

          Estimated duration: 30 mins

          terraform apply -var-file=testing.auto.tfvars
          

        Connect to an IKS cluster

        1. Replace the cluster-name (including <>) with the the cluster name.

          export IKS_CLUSTER_NAME=
          
        2. Log in to the IKS cluster using the following command:

          ibmcloud ks cluster config -c $IKS_CLUSTER_NAME --admin
          
        3. Set the values of both the ingress subdomain and the ingress secret of your cluster. Those values will be used in the deployment yaml later.

          export IKS_INGRESS_URL=$(ibmcloud ks cluster get -c $IKS_CLUSTER_NAME | grep "Ingress Subdomain" | awk '{print tolower($3)}')
          export IKS_INGRESS_SECRET=$(ibmcloud ks cluster get -c $IKS_CLUSTER_NAME | grep "Ingress Secret" | awk '{print tolower($3)}')
          
        4. Verify the values you set

          echo $IKS_INGRESS_URL
          echo $IKS_INGRESS_SECRET
          

        Installing the software

        Install K10 Dashboard

        1. Add the Kasten Helm charts repository using the following command:

          helm repo add kasten https://charts.kasten.io/
          
        2. Run a repo update to get the latest Kasten version.

          helm repo update
          

          Note: you can see the version by running the command: helm repo list --versions

        3. Create the namespace where Kasten will be installed. By default, the installation creates the namespace kasten-io.

          kubectl create namespace kasten-io
          
        4. Install Kasten K10 in IKS using the following Helm command:

          helm install k10 kasten/k10 --namespace=kasten-io
          

          Use this command to install on OpenShift helm install k10 kasten/k10 --namespace=kasten-io --set scc.create=true

        5. Check that installation is complete and all pods are up and running in the kasten-io namespace:

          kubectl get pods -n kasten-io
          

          Note: It takes 3 mins to get all the pods up and running.

        6. Check the status of PVC

          kubectl get pvc -n kasten-io
          
        7. Create a route for accessing the Kasten dashboard:

          kubectl apply -f - <
        
        1. Open the K10 dashboard in a browser
        
            ```sh
            open https://$IKS_INGRESS_URL/k10/
            ```
        
        1. Accept the Terms
        
           ![storage classes failed](https://kastenmarketplace.s3.us-west-2.amazonaws.com/ibm/k10-accept-terms.png)
        
        ### Configure Storage Class for Snapshot Volume
        
        The default storage class **ibmc-vpc-block-10iops-tier** needs to be validated. To do so, the Kasten annotation must be added to the VolumeSnapshotClass first.
          
        1. Annotate the Volume Snapshot class
        
            ```sh
            kubectl apply -f - << EOF
            ---
            kind: VolumeSnapshotClass
            apiVersion: snapshot.storage.k8s.io/v1
            metadata:
              name: ibmc-vpcblock-odf-10iops-snapclass
              annotations:
                snapshot.storage.kubernetes.io/is-default-class: "true"
                k10.kasten.io/is-snapshot-class: "true"
            driver: vpc.block.csi.ibm.io
            deletionPolicy: Delete
            EOF
            ```
        
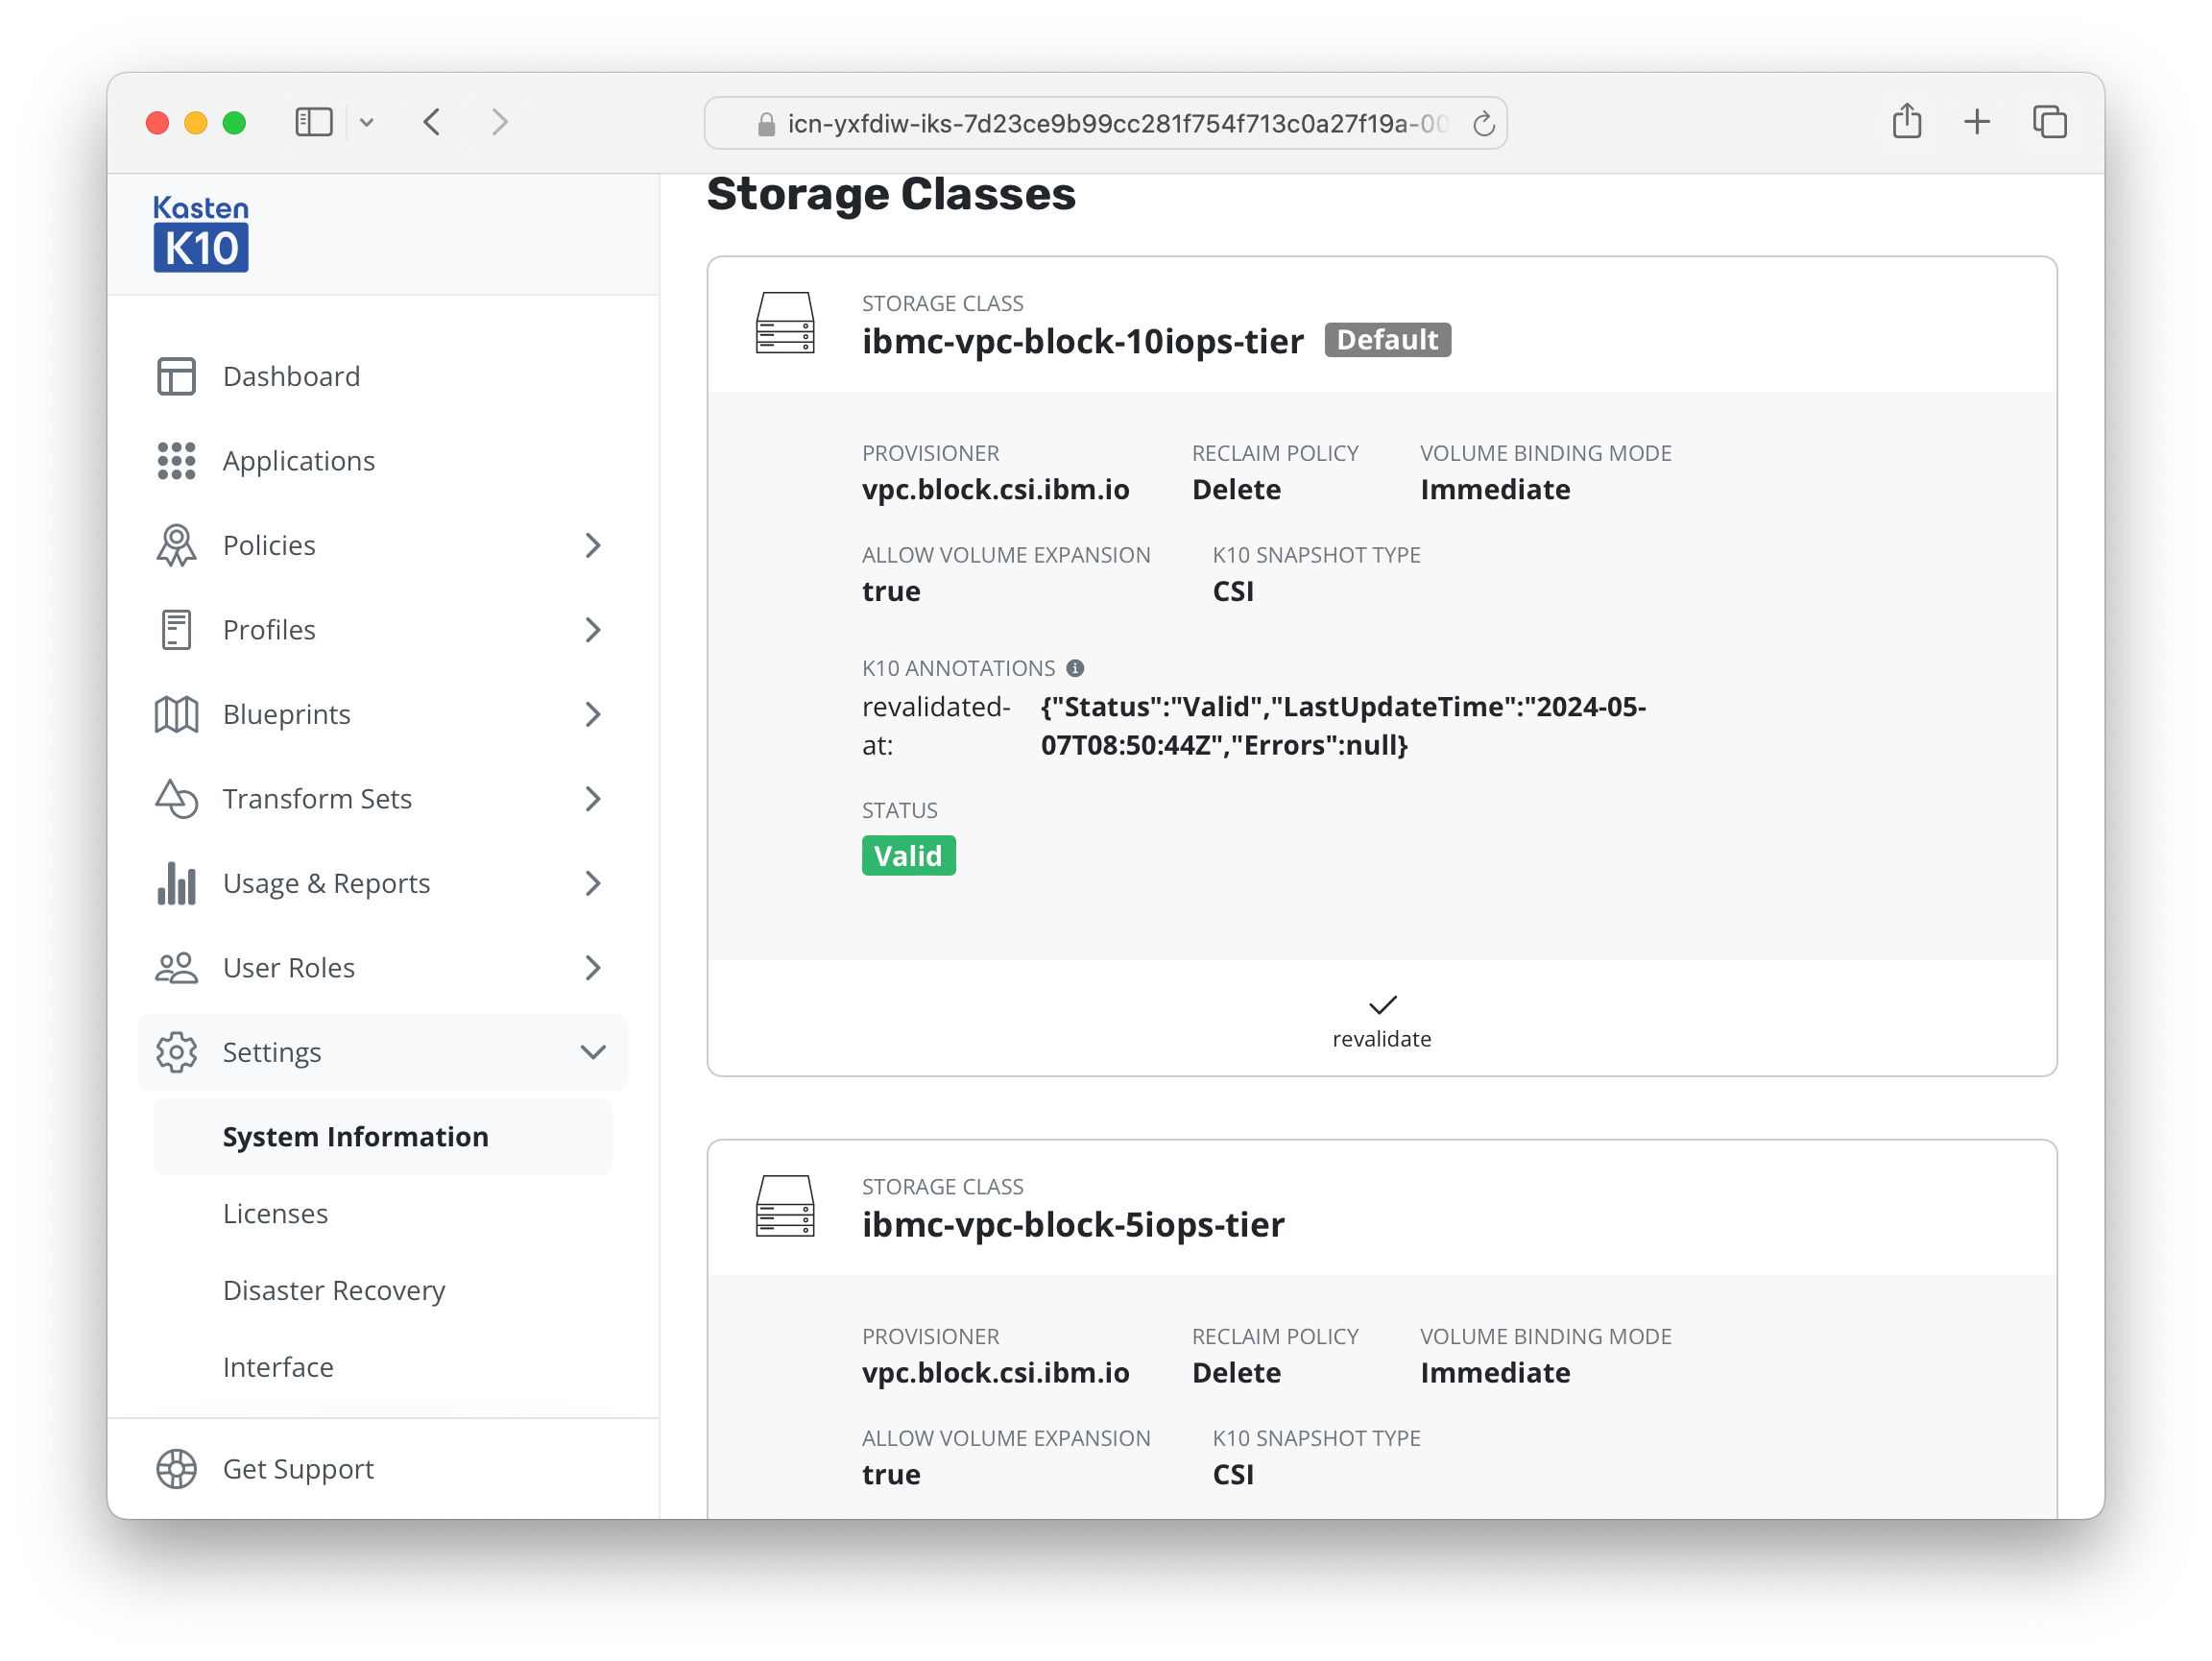
        1. In K10 console, go to the Settings > System Information. Scroll down to Storage Classes.

        2. Click on Validate button on the right hand side in the storage class ibmc-vpc-block-10iops-tier

        3. After the few seconds, the status should become Valid.

          storage classes

        Create Location profile for IBM COS Smart bucket

        Location profiles are used to create backups from snapshots, move applications and their data across clusters and potentially across different clouds, and to subsequently import these backups or exports into another cluster.

        Exporting or importing data requires an object storage location. We will use the IBM COS Bucket created via Terraform. IBM COS is an S3-compatible object storage system hosted on IBM Cloud.

        1. The COS credentials have been automatically generated by Terraform. You should see the following when your terraform apply completes.

          COS credentials

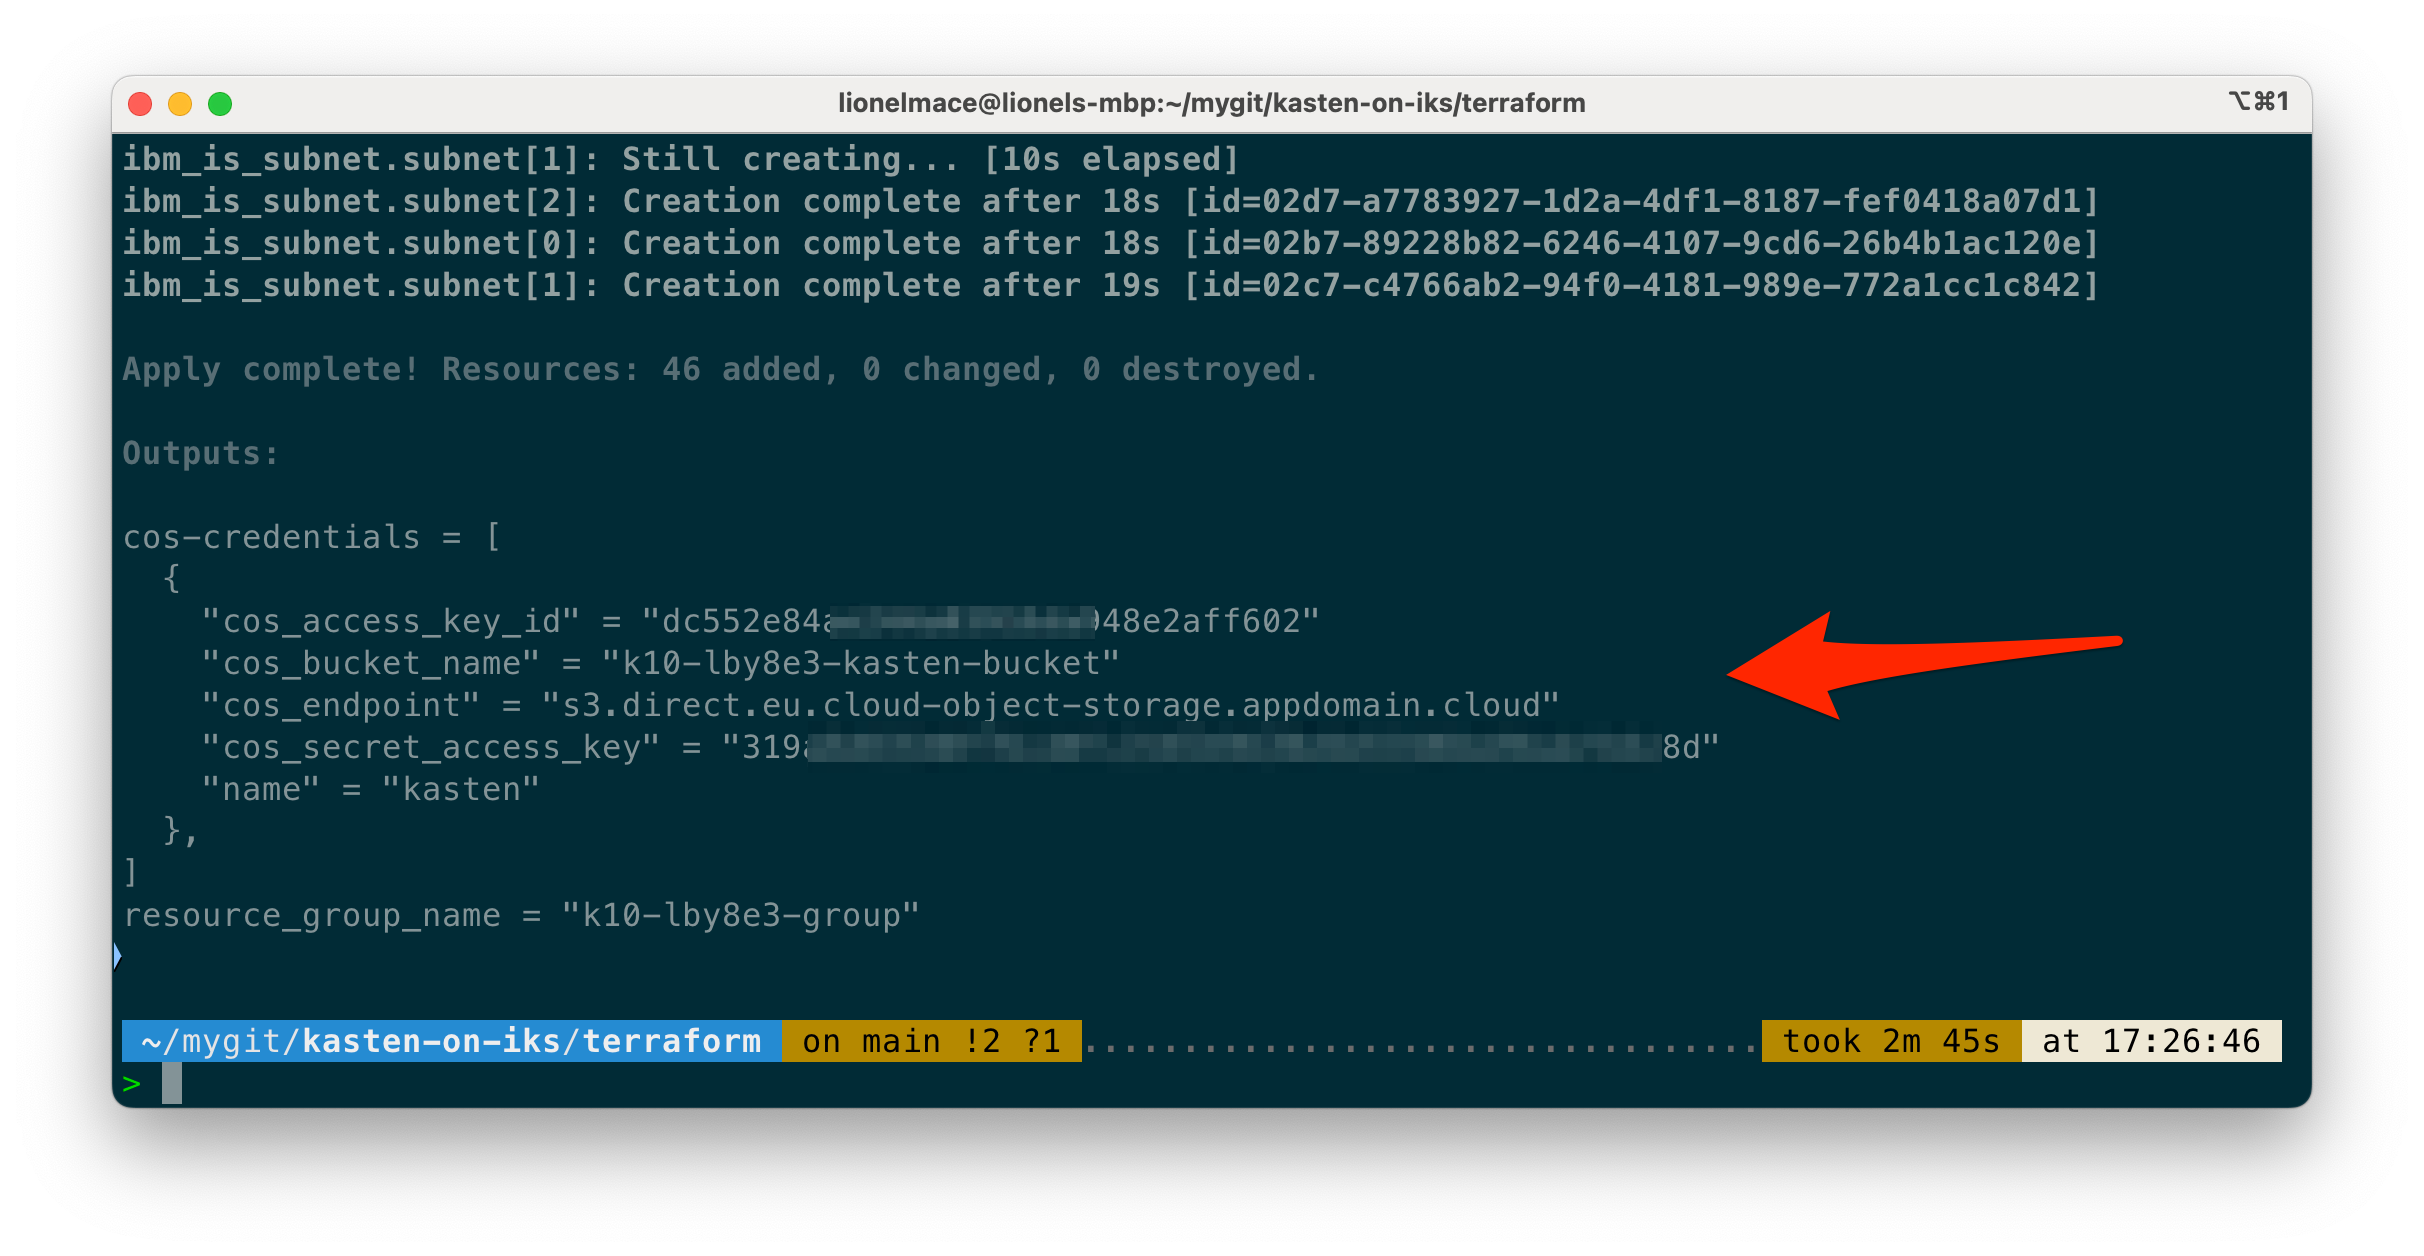
        2. Let's set those IBM COS values into variables to reuse them later.

          ibm_cos_access_key_id= 
          ibm_cos_bucket_name= 
          ibm_cos_endpoint= 
          ibm_cos_access_key_secret= 
          
        3. Create a Kubernetes secret to store the COS credentials for K10

          kubectl create secret generic k10-cos-secret \
            --namespace kasten-io \
            --type secrets.kanister.io/aws \
            --from-literal=aws_access_key_id=$ibm_cos_access_key_id \
            --from-literal=aws_secret_access_key=$ibm_cos_access_key_secret
          
        4. Create Location profile for IBM COS Smart bucket

          echo | kubectl apply -f - << EOF
          ---
          apiVersion: config.kio.kasten.io/v1alpha1
          kind: Profile
          metadata:
            name: cos-profile-smart
            namespace: kasten-io
          spec:
            type: Location
            locationSpec:
              credential:
                secretType: AwsAccessKey
                secret:
                  apiVersion: v1
                  kind: Secret
                  name: k10-cos-secret
                  namespace: kasten-io
              type: ObjectStore
              objectStore:
                endpoint: https://$ibm_cos_endpoint
                name: $ibm_cos_bucket_name
                objectStoreType: S3
                skipSSLVerify: true
          EOF
          
        
            > Disabling SSL verification is only recommended for test setups.
        
        1. You should now see the Location Profile in K10 Dashboard
        
            ![K10 profile](https://kastenmarketplace.s3.us-west-2.amazonaws.com/ibm/k10-profile.png)
        
        Congratulations! You have been completed the installation of Kasten K10 on IKS.
        
        ## Upgrading to a new version
        
        Upgrading Kasten can be accomplished via helm commands:
        
           ```sh
           helm repo update && \
            helm get values k10 --output yaml --namespace=kasten-io > k10_val.yaml && \
            helm upgrade k10 kasten/k10 --namespace=kasten-io -f k10_val.yaml
        

        Uninstalling the software

        Uninstalling Kasten can be accomplished via helm commands:

        ```sh
        helm uninstall k10 -n kasten-io
        ```
        

        Resources

        • Kasten K10 Overview
        • Kasten Release Notes
        • Kasten Supported Kubernetes Version