Readme file
Description
Deploy a single BYOL FortiGate in IBM Cloud using the Schematics service.
Deployment overview
Note: For a local deployment a Gen 2 API key will be needed. For details see: IBM Gen 2 API key
This deployment requires that you already have the following already configured:
- A VPC
- Two subnets
- An ssh key
Terraform deploys the following components:
- A FortiGate BYOL instance with two NICs, one in each subnet
- A Floating Public IP address attached to the FortiGate
- A Logging disk
Deployment:
-
Fill in the required VPC, Subnet and ssh key values as shown below:
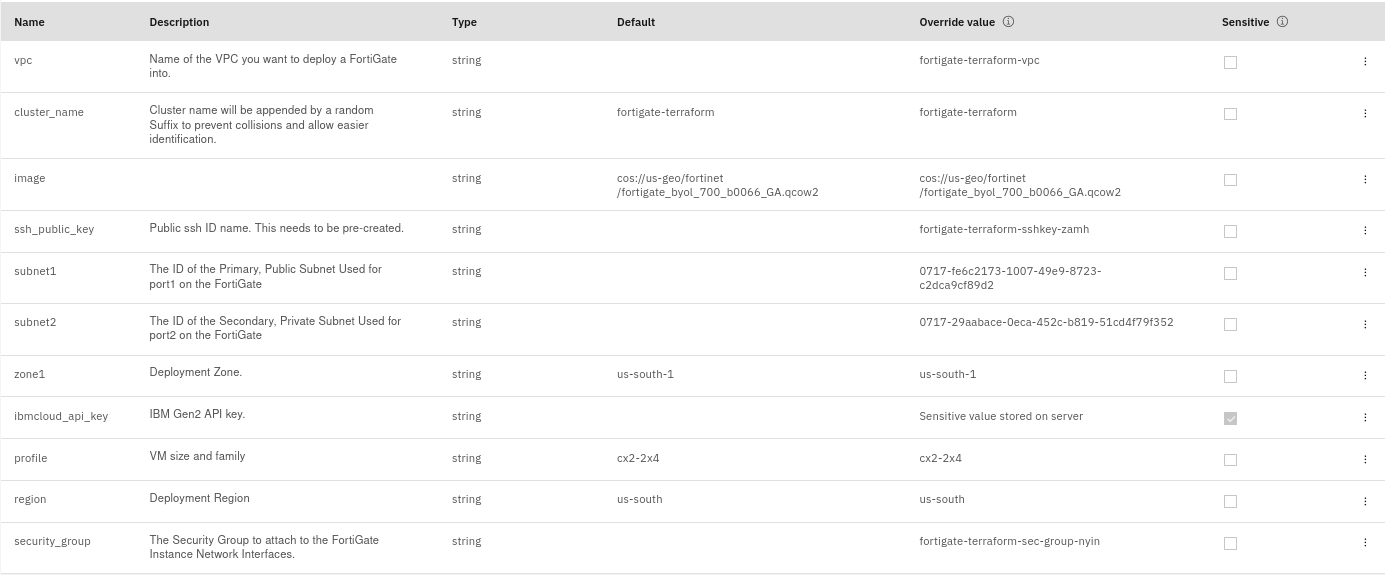
Note For Subnets, put the UUID of the subnet. Not the name

-
Apply the Plan.
-
Outputs, such as the Public IP and Default username and password can be found under the
View Loglink.

See below for info on destroying the cluster.
Alternative Schematics Deployment
Deploying This package from IBM Schematics is possible. To do so navigate to the Repo at https://github.com/fortinet/ibm-fortigate-terraform-deploy and follow the steps below:
-
From the IBM console navitagte to Schematics.
-
Fill in the workspace info and create your workspace.
-
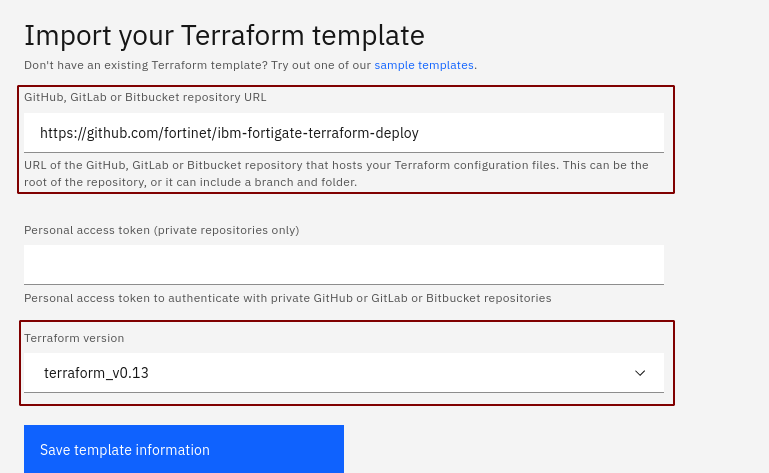
Copy the repo URL into repository URL field and then select Terraform version 0.13.
-
Add in and adjust any Variables as needed in the settings.
-
Apply the plan.
-
Outputs, such as the Public IP and Default username and password can be found under the
View Loglink.
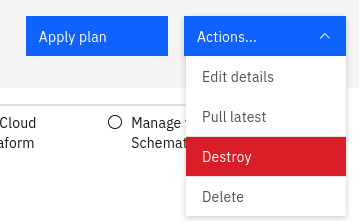
Destroy the cluster
To destroy the cluster, click on Actions...->Destroy
Support
-
FortiGate is supported by Fortinet Inc in 24x7x365. Please refer https://www.fortinet.com/support for more details. If you encounter problems, you can open a support issue with the Fortinet via the methods listed in https://www.fortinet.com/support/contact.
-
Support locations include: Argentina, Australia, Austria, Bahrain, Belarus, Belgium, Bermuda, Brazil, Brunei Darussalam, Bulgaria, Canada, Chile, China, Colombia, Costa Rica, Croatia, Cyprus, Czech Republic, Denmark, Dominican Republic, Egypt, Estonia, Fiji, Finland, France, Germany, Greece, Hong Kong, Hungary, Iceland, India, Indonesia, Ireland, Israel, Italy, Jamaica, Japan, Jordan, Korea, Republic of, Kuwait, Latvia, Lithuania, Luxembourg, Macao, Malaysia, Mauritius, Mexico, Monaco, Netherlands, New Zealand, Norway, Oman, Peru, Philippines, Poland, Portugal, Puerto Rico, Qatar, Romania, Russian Federation, Saudi Arabia, Singapore, Slovakia, Slovenia, South Africa, Sri Lanka, Spain, Sweden, Switzerland, Taiwan, Thailand, Turkey, Turks and Caicos Islands, Ukraine, United Arab Emirates, United Kingdom, United States, Virgin Islands, British, Virgin Islands, U.S., Uruguay, Venezuela, Bolivarian Republic of, Vietnam.
-
For direct issues related to this Terraform template, please refer to the Issues tab of this GitHub project.
-
For other questions related to this project, contact github@fortinet.com.
License
License © Fortinet Technologies. All rights reserved.
